Setting Presentation Settings for Activities
You can set presentation settings for a leaf item within a learning
activity. Presentation settings are different for tests,
quizzes, or assessments. Presentation settings determine the time
limit for an item and what navigation options are offered by the LMS (such as whether to display
an exit link). Navigation options are often set within the SCORM package
that is loaded to the LMS
. However, you can use these settings to override what was loaded. It
is advisable to test the behavior of the after changing these settings.
Note: If the learning
activity does not report progress immediately and does not detect when
users navigate away, you may not want to enable any of the navigation
links, to avoid losing data.
To
set presentation options for individual items:
Choose the appropriate client
or your own organization.
Open the activity
detail screen.
Click the name of the folder
in which the leaf item is stored, if necessary.
Click the name of a leaf
item.
Click Edit
(below an item name).
From the Edit
menu, choose Presentation.
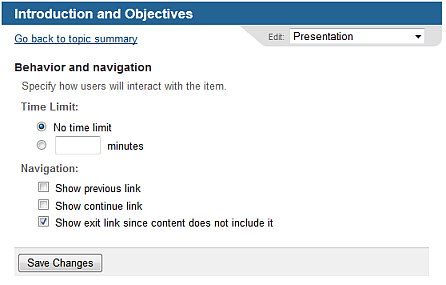
You see the Presentation
Options screen.
If the
user is to have a limited time to complete the item, enter a Time Limit, in minutes.
Note: Time limits are enforced by the interactive learning
content: set this only if your content uses this parameter.
To provide a link to let
users navigate to the previous sibling item in the content, check
Show previous link.
Note: Using the previous
navigation link has the same effect as clicking Launch or Resume on
the previous sibling item.
To provide a link to let
users navigate to the next sibling item in the content, check Show continue link.
Note: Using the continue
navigation link has the same effect as clicking Launch or Resume on
the next sibling item.
If
the content contains its own user interface control to allow users
to exit from the content, clear Show
exit link since content does not include it.
Click
Save Changes.
Note: At any given level in the learning activity's hierarchy,
you should set these values consistently where possible, so all siblings
have the same presentation settings.
To set presentation options for
items in multiple learning activities:
Choose the appropriate
client or your own organization.
Click Content
(tab), then Activities (menu).
Check
each of the activities for which you want to set presentation options
or check the checkbox in the header to check all listed activities.
From
the Select Operation menu
at the bottom of the screen, choose Presentation
and click Go.
You see the Presentation screen.
Choose
the Type of item to which
the presentation settings should apply and specify the appropriate
settings.
Click
Save Changes. The presentation
settings are changed for all items of the selected type in all the
selected activities.
