Choose the appropriate client or your own organization.
Click Configuration (tab), then Locations.
Click Import locations.
Browse to the location of the CSV file and open it.
Click Next.
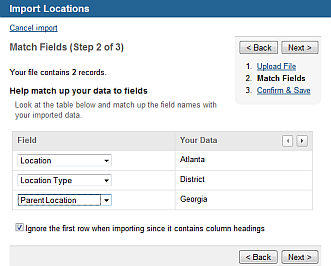
You see a progress indicator, then a screen that allows you to match the contents of the CSV to the potential contents of the record.
Import Locations Screen
If the first row of the file contains column headings, check the Ignore the first row when importing... option: the screen shows, in the Your Data column, the second row of the
CSV file.
- or -
If the first row of the file does not contain column headings, clear the Ignore the first row when importing... option: the screen shows, in the Your Data column, the first row of the
CSV file.
Use the arrow buttons to view additional rows, if necessary.
For each column in the CSV file, choose the matching Field, or choose Do not import this field.
Click Next.
If any errors are found in the CSV file (for example, data needed for creating a record is missing, or you specify a location parent without a location level), you are prompted to either view the error file or proceed. Rows with errors will not be imported. Choose to cancel (so you can change the matching or the CSV file itself and try again) or continue.
You see the Confirm and Save screen.
If the CSV file contains information for an existing record, you can choose whether to leave the record unchanged or update the record.
Click Confirm and Save.
The information is imported.
