Open the activity detail screen.
To add a file to a folder,
open the folder and click Add File.
To add a file to the top level of a learning activity, click Add File.
You see the Add File screen.
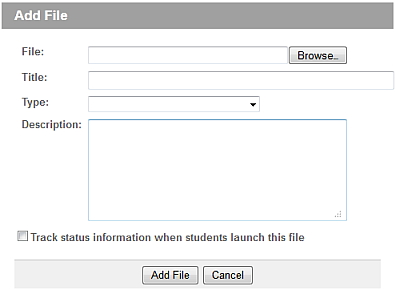
Browse to the file to be added.
Enter a Title, choose a Type, and enter a Description for the file.
If you want the completion
status of this item to contribute to the status of its parent ("rollup"), check
Track status information when students
launch this file.
If not checked, attempts
at this item are still tracked but are not considered when the LMS rolls-up status to parent items.
No status information is displayed to users for un-tracked
items. However, you can turn
tracking on later.
Click Add
File.
The file is added to the top of the selected area. If necessary, you
can change the order
of the items to move the new file to a different location, but this
should be done with caution: sequencing may be based on achieving
objectives, and changing the order does not change the objective references.
You can, if appropriate, add the same file multiple times to the same learning activity. To replace an existing file, delete it (click on it and then click Delete) and add it again. The replacement will appear as a new item to users, with a status of "not started".